How to Convert a Regular Mailbox to a Shared Mailbox (June 2015)
First login to the Office 365 Admin Center; https://portal.office.com/ (You must be an administrator).
From the Admin Center dashboard, scroll down on the navigation panel on the left; until you see Admin-> Exchange.
This will open a new window, known as the Exchange Admin Center.
Next, select "Recipients" from the navigation panel on the left.
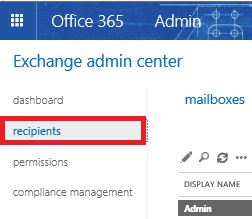
By default, you will be on the Mailboxes tab.
Select (by clicking the account) the user you want to convert to a Shared Mailbox, and select "Convert" from the details panel on the right.
Scroll down until you see the above pictured.
After selecting Convert, allow the process to complete.
You can confirm the user has been converted, by selecting the "Shared" tab on the top menu.

If the user appears in this list, you know that the user has successfully been converted.
You can now remove the user license by going back to the Admin Center-->Active Users.
If you wish to convert a Shared Mailbox to a Regular Mailbox, please add the email license first; then use the same process in the Shared tab, as you did in the Mailbox tab above.
-
Please send an email to helpdesk@vos365.com if you have further questions or comments.
-
Leave a comment!
You must be logged in to post a comment.