How to create a Distribution List in Office 365
First login to the Office 365 Admin Center:
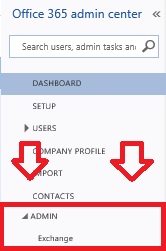
Find the Admin-->Exchange shortcut on the navigation pane on the left side, scrolling down you will find it near the bottom of the list (pictured above).
This will take you to a new window, opening the "Exchange Admin Center".
By default you will load to the dashboard, so select "Recipients" below the dashboard; and Groups from the above menu (pictured below).

Now select the drop down arrow next to the + symbol, and select "Distribution group" (pictured below).
*Please note the option to select Security groups and Dynamic distribution groups, both useful for managing group permissions or managing a list by user details field (not explained in this article).
After you create the new Distribution Group, you will now need to fill out some information (pictured below):
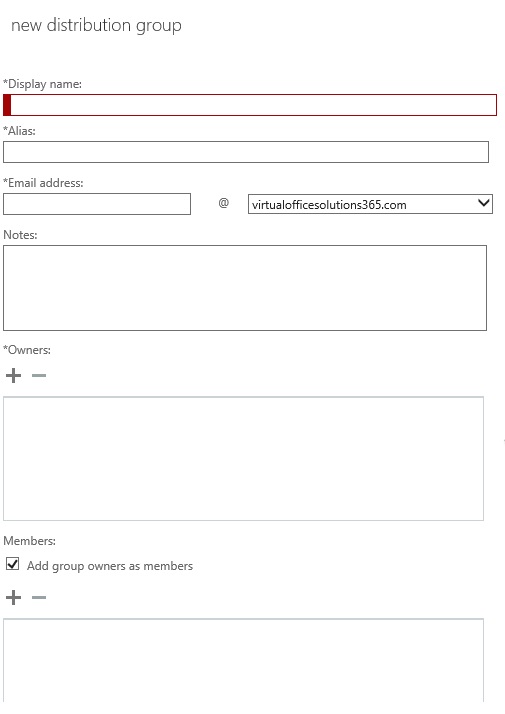
*Display name : Type in the name you want to be displayed when receiving an email from this address.
*Alias : Type in the name for this email, that will identify it without use of the domain name (typically the same as the first part of the email address. Example: helpdesk@vos365.com; alias: helpdesk
*Email Address : Type in the desired email address for this distribution group, which typically matches the alias.
Please note the drop down menu at the end, where you can select which domain you want to give to this user.
By default, every user will be given the .onmicrosoft.com domain option, and any other domain you have verified with Office 365.
You can mix and match different users primary domains with in one Office 365 site, allowing you to manage all your email domains from one Admin Center, and one SharePoint site.
*Owners : Another required field is the Owners Group, which manage this distribution list (typically the Office 365 Admin). The owner can also be a member, but is not required.
Owners will manage the members list, and change the settings of this list.
Members : This might as well be a required field, because without members; no one will received emails from this Distribution List once completed.
The members should include anyone you want to receive emails sent to this Distribution List.
Finally, you will select how you want this members list to be handled (pictured below):
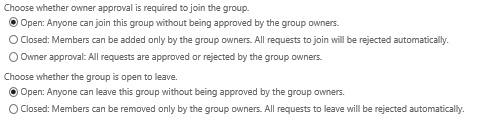
Select wither you want this Group to be Open, Closed or Owner Approval; Users can request to become a member of a group, and can automatically be joined or approved.
As a best practice, we like to close these groups and allow the Office 365 Global Admins to maintain these memberships. This will allow the groups to be more securely managed, and correct members.
IMPORTANT!
After saving the new Distribution List, you must open it again to confirm the settings (pictured below):
By default, a Distribution Group will be configured to "Only senders inside my organization".
Which is great for an internal only address (for security), but if you want people outside your organization to be able to email this address; make sure "Senders inside and outside my organization" is selected.
While you are there, check the Owner and Member list to make sure it looks correct.
Sometimes it will make an Owner a member, when you didn't want the owner as a member.
If everything looks correct, then save the Distribution List for a second time.
Please send a test email to this list, to confirm it's working which can also alert the members that this list is now active.
Optional:
You can also give users access to "Send As" this distribution list, email address.
If you open the Distribution List, and select Group Delegation; you will see the option to give Send As and Send on Behalf permission.
Only if the user has the need to send as that email address, as a reply.
If you want to learn more about Security Groups or Dynamic Distribution Groups, please request a link to our How to article.
Thank you,
Virtual Office Solutions Inc.
Leave a comment!
You must be logged in to post a comment.